As a student, you’ll be aiming to secure an internship, or better still, a junior position as a designer. Prospective employers will probably see your portfolio before they get a chance to talk to you. Because of this, your portfolio has to speak on your behalf. As well as evidencing your expertise in sketching and model-making, it provides clues about your train of thought and your ability to work efficiently and effectively.
Efficient workflow is important to employers as they’ll be looking to hire someone who can stick to the brief, can work on a range of projects simultaneously and is comfortable deciding the direction of the concepts they are working on without endless input from managers. In this article, I will talk about how you can provide employers with a favorable impression of your workflow.

It’s really important to narrate how projects progress in a way which is easy for others to follow. It shows you are organised and can think clearly. Often, employers only spend a few seconds looking at portfolio, so the narrative has to be very clear.
Including a mood board and keywords allows you to illustrate contexts that drive the design phase. Benchmarking competitor products also helps you to position your concept in the marketplace. Many students leave contextual research out of their portfolios, jumping instead into showing sketches. This is unhelpful as it can feel like starting a conversation in the middle of a sentence—you might know what you want to say, but people listening to you won’t.

Instead of succinct keywords, some students include a lot of text, explaining their influences in minute detail. Employers don’t have time to read blocks of text. Including them suggests that you’re not very good at editing yourself—not a good starting point if you want to show you have an efficient workflow.
Illustrating the intended user (or users) also helps to contextualise a project. You’ll need good images of the type of user and some information on aspects like their age-group and lifestyle. (These users are often called personas). Images of activities they engage in and brands they like to associate with will help you to build a picture of them. Again, it is surprising how many students do not include personas—neglecting to do this provides a ‘false start’ to a project.

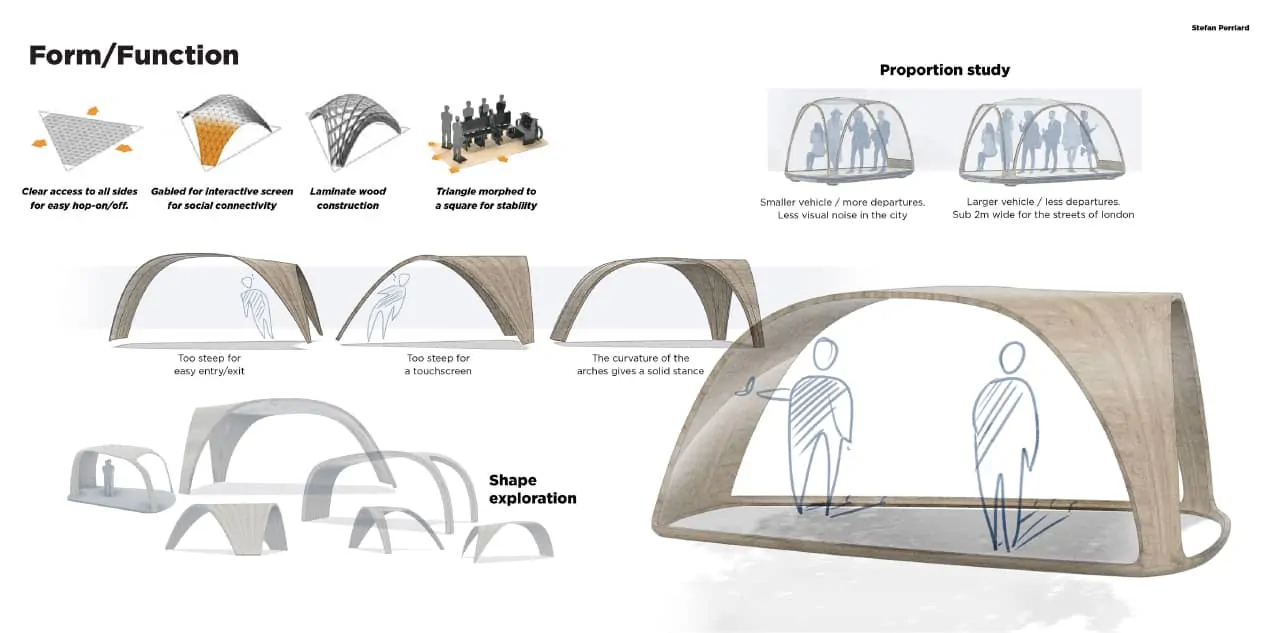
It’s important to include a range of development sketches for each project. Your ability to quickly contribute ideas will work in your favour when it comes to being hired. The connection between the typology of the vehicle you are sketching and your contextual resources (e.g. mood images; benchmarking; persona) should be clear. It shows you have a rational train of thought and that you can move between phases of a project effectively.
Designers don’t create concepts in isolation. To illustrate, strategists within an OEM often advise the design team on possible routes for future vehicles. Designers have to successfully interpret and ‘translate’ this information into concepts that adhere to a specific engineering package. Evidencing a connection between sketches and research suggests you may be able to interpret data successfully.

Many students include sketches that bear little connection to the contextual research they have shown in mood images. One reason for this is that some students create moodboards after completing the project as a ‘box ticking’ exercise. It’s pretty obvious when this is the case.
It’s surprising how many students jump straight into showing renderings without including much in the way of development work. This provides a prospective employer with little chance to understand how you developed your project—and therefore severely limits access to your train of thought. Worse still, it can suggest that the reason you haven’t shown development sketches is because you haven’t got any to show. It raises the question, did this student copy the concept?

You should include a key sketch—a drawing that informed your final design direction. Adding additional shading or perhaps even circling it helps to draw attention to it as the key sketch. Its inclusion suggests you are capable of reflecting on your sketches and making decisions on which direction is the most appropriate to develop. Your final renderings should of course be developments of the key sketch—again evidencing a rational thought process. Once again, it’s surprising how many students include final renderings that have little connection to the sketch phase of the project.
Due to the coronavirus pandemic, the likelihood is that employment opportunities in the field of vehicle design will continue to be limited for months to come. Working on representing your workflow in your portfolio will help you to stand out as a clear thinker and an effective designer, increasing your chances of securing employment.